Appropriate camera settings for indoor photography are half the battle when it comes to capturing eye-catching, sharp photos. The issue is that such images frequently have poor lighting, therefore suitable settings are required.
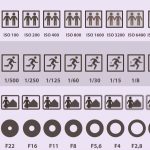
The ability to strike a balance between the exposure triangle, which includes aperture, shutter speed, and ISO, will be the key to a stunning photo for you.
Basic Camera Settings for Indoor Photography
The first thing I recommend for amateur indoor photographers is to purchase a dependable tripod for DSLR or any other camera to stabilize your equipment and the footage you capture.
Furthermore, it allows you to select shorter shutter speeds and lower ISO values, which will undoubtedly assist you overcome adverse lighting conditions. The following indoor photography settings will work best with a tripod.
Exposure Mode
The features of manual mode include complete control over exposure settings, aperture values, and shutter speeds for fine-tuning the frame. This is a wonderful alternative for indoor photography ideas, where the camera is frequently unable to properly set the exposure due to poor lighting.
Pro Tip: In automated mode, the camera may turn on the flash when it is not required. A flash targeted at the face will eliminate natural shadows while highlighting only the foreground.
Portraits and close-ups in automated mode reduce volume and render the faces in the photograph flat. In this mode, the camera may not focus where it should, therefore use suitable indoor photography settings.
Shutter Speed
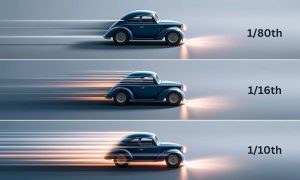
As an experienced portrait photographer, I recommend setting your shutter speed between 1/60th and 1/80th. It all depends on a variety of elements, including camera steadiness, lens length, the speed of the thing you’re shooting, and more.
When choosing the initial shutter speed, photographers employ a simple yet efficient approach called the reciprocal rule. It’s simple: take the reciprocal of your camera’s focal length. More specifically, with a lens length of 50 cm, you can photograph flawlessly at 1/50 s, 10 cm at 1/100 s, and so on.
Aperture Settings
Regarding the aperture, it’s a good idea to start with the widest aperture your lens can produce, which is comparable to the camera settings for portraiture. Usually, this range is f/2.8 to f/5.6, but if your lens can go higher, f/1.8, f/1.4, and higher will work best.
By doing this, you may make sure that more light reaches the camera’s sensor and use a longer shutter speed without reducing overall brightness.
The drawback of using these camera settings for interior portraiture is that it will reduce the depth of field in your images. This means that you will only be able to focus on a portion of the composition if you are trying to get a clear shot from front to back.
ISO
Photographers will likely never tire of trying to figure out the best ISO to use to compensate for indoor darkness, which will let them use narrower apertures and faster shutter speeds without sacrificing acceptable noise levels. The answer to this topic is still unknown, but here’s a quick tip to help you choose the ideal ISO level for indoor photography.
Play around with all the available ISO values when shooting scenes, and then review the 100% sized computer images that result. When shooting indoors, choose the highest ISO that doesn’t contaminate the film and keep it in mind.
Comparing this to camera settings for product photography, it’s not always ideal to use a high ISO when taking indoor photos. Photographers frequently utilize a flash or aim their camera near a window that lets in enough light to produce rapid shutter speeds and good exposures, even at ISO values lower than 800.
But if you’re shooting in poor light, raise the ISO progressively until you reach a level that you find acceptable. When that happens, I advise adjusting the shutter speed rather than raising it any further if needed. Even though the image appears a little grainy, it will still be preferable to an incorrect ISO in the end.
White Balance — Test The Auto Mode
The best indoor camera setting for a given scenario is determined by the illumination and indoor photoshoot locations. Such sources should absolutely be taken into consideration. For example, let’s say you are photographing in a small pub that is probably furnished with warm incandescent, fluorescent, and halogen spotlights with the same field of view.
Pro Tip: Since the RAW format enables color profile assignment or adjustment during post-processing, it makes sense to use it in certain situations. The camera’s automated white balance for JPEG files allows you to concentrate on focus, exposure, and composition.
FAQ
1. What happens when I choose AV, TV, or P mode?
These are semi-automatic camera modes with one of the following priority levels.
AV mode is an aperture-priority option for images that have a blurred backdrop. It has manual aperture and ISO settings, and the amount of light is changed automatically based on shutter speed.
TV is a shutter priority camera, allowing you to capture dynamic sceneries and blur moving objects. The shutter speed and ISO can be set manually, but the aperture is automatically regulated.
P mode just allows you to change the ISO value.
2. Can you take quality interior portraits without using an off-camera flash?
Yes, particularly if you employ the interior photography settings that are advised. When photographing next to a window, you might not need to use an external flash because of the natural light pouring in from the window.
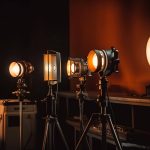
No issue if you’re taking pictures indoors without a window. Install artificial indoor photography lighting using a DIY light box or a shaded lamp.
3. Which shutter speed works best for taking pictures inside?
If you are not using a tripod, the shutter speed ought to yield sharpness while staying within the required range. This is usually 1/80s, although it can change according on the focal length of your lens.