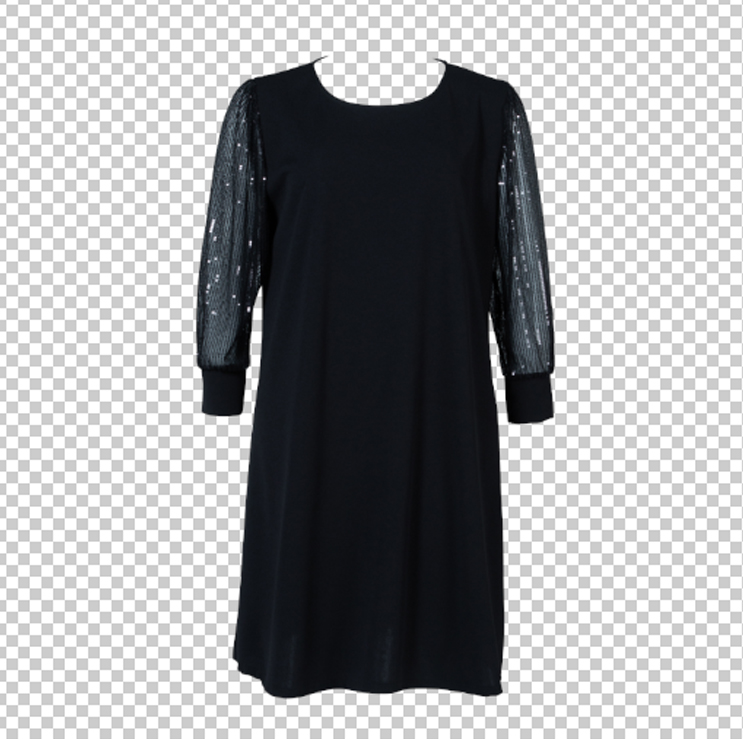
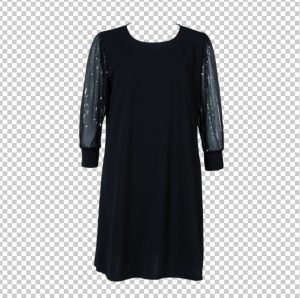
People love the Ghost Mannequin effect as they can have an overall idea of the dress. And the exciting part is they don’t even realize what effect is applied there. All they care about is a lucrative 3D effect. But how to create the Ghost Mannequin effect in Photoshop? We will unwrap the steps together!
You may ask why clothing industries have a specialized editing style altogether. Clothing comes in as a primary means of fashion. Apparel leads the glamour world, moving forward from the bare need stage. Currently, the invisible mannequin effect helps business owners and image editors alike.
Ghost Mannequin Effect and Its Magic
The service has a trace of magic in its name itself. What does this invisible mannequin effect actually offer? Expert designers perform their edits and wipe out the Mannequin from the image. This way, the product gets a 3D effect that feels more realistic to the eye.
This magical service is also known as the Hollow Man effect. But sorry to spoil the spell for you; this is a very real-life skill. The primary tool needed for the impact is Adobe Photoshop software. Let’s explore why the demand for this invisible effect is so massive.
Who Needs Ghost Mannequin Effect
Ghost mannequin photography dominates the apparel industry. But think of it as something other than a limited field of service. You’ll feel the need for ghost mannequin Photoshop in many ways . Any e-commerce platform owner would definitely need Ghost Mannequin service for their business. It is now unanimously true to be the people’s favorite for clicking on products. If you own a fashion house or merchandise, Ghost Mannequin can greatly help you. Your audience must see a believable ad campaign demo to love the product.
What’s the Process for the Ghost Mannequin Effect
This editing is a combination of two stages. You have to have the products shot as it depends on actual clothes. So. there are two steps for Ghost mannequin effect. Product photography with the clothing materials . Editing the images in Photoshop
Fortunately enough, you’ll learn about both steps in this article.
Part 1. Perfect Ghost Mannequin Photography
Completing this part with perfection will create an excellent base for the editing. You can always get help from the image editing experts, true! They can enhance the image, but a perfect original photo makes a huge impact.
What makes a good photo? You need an excellent pre-production setup to come up with impressive ones. Shooting preparation includes many things, from lighting to Mannequin. Keep reading for the details and extra tips!
A Fitting Mannequin
Make sure that you have the right Mannequin in stock. Compare the fittings of the apparel to the Mannequins you have. Trust me, this will save you a lot of trouble each time! You’ll find Mannequins for men’s wear, female dresses, and kids wear.
What will happen if you don’t have the fitting Mannequin? The shapes of the dresses will look distorted so that images will have a clumsiness to them.
Try to purchase the perfectly shaped Mannequin if you own the business. Or, keep some mostly used shapes in case you are a photographer. There are some Mannequins with shape adjustment facilities. Investing in those will be a good idea.
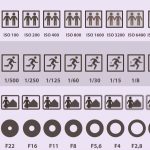
Good Camera
A camera can impressively impact the image quality for you. But this doesn’t mean you’ll only have to invest in the most expensive one. Look for cameras that have high-resolution and proper settings for adjustments. What are the adjustment points for a good photo? Let’s find out below-
- Iso
- Aperture
- Shutter Speed
- Color Space
- Exposer
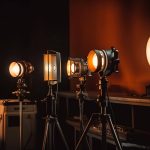
Perfect lighting
There’s more to the photography apart from props and apparatus. Lighting does the majority part of the magic in any good image. Natural light is the best source of lighting that you can have. So, picking the right place for shooting is also crucial. If you are thinking of making a studio, keep natural light flow in your mind.
But what should you do when natural light is hard to get? In those cases, you’ll have to go for artificial lighting. The lighting will be at your disposal anytime you want. These are a great help when you learn to set up quickly.
Strobe lights work great as a quick flash. Besides, your studio needs a good LED or Tungsten light source.
Matching Background
A perfect background is another thing that comes after lighting. There are varieties to choose from for background as well. Perfect backgrounds do not always come in paid versions. Anything can be a backdrop if you have impromptu senses enough. Use a piece of neat clothes in case of emergency.
There are a lot of varieties of canvas material. Collapsible canvases are a great choice for regular use. You can also go for boards or green screens. You might have to bear some expenses for the first time. But the investment in shooting props is always worth it!
How To Create Ghost Mannequin Effect in Photoshop: Step-By-Step
Now starts the fun part! You can always outsource the product shoot, but learning the edit is the real deal. Now, I’ll describe the steps for the invisible effect in easy terms.
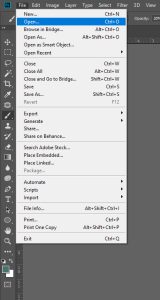
Step 1: Set the Image
I’m trying to make the process as straightforward as possible for you. For the first step, open the photoshop and upload the image file you’ll work on.
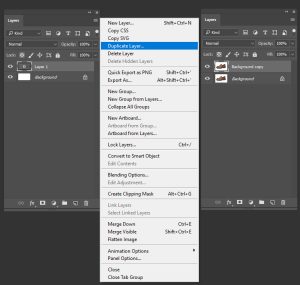
Step 2: Layer Unlock
Now, you have to unlock the layers to work on the image. Do make a duplicate of the layer so you can recover from any mistake.
Step 3: Select Pen Tool
Now, start with the clipping part for the subsequent editing. Go to the toolbar for selection and zoom in as much as you can. Zooming helps in flawless clipping. Now, you must go around the image to cover the entire radius. An expert hand can do it with fabulous speed, whereas a newcomer will need some practice to adapt. Try to exclude all the unnecessary parts as much as possible. But be careful not to eliminate any part of the product body.
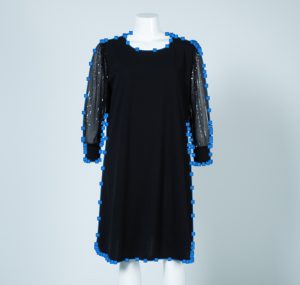
Step 4: Adjust the Anchors
You need to adjust the anchor points perfectly to keep the shapes intact. Any slipping can lead to shape distortion. On the other hand, clumsy clipping can leave unwanted background parts around the image.
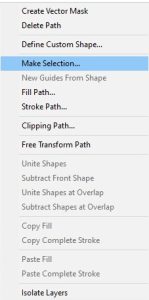
Step 5: Selection from Path
Click on Control and Enter simultaneously for path selection. This selection will enable the clippings you’ve made so far. Now, it is easier to separate the selected portions from the remaining part.
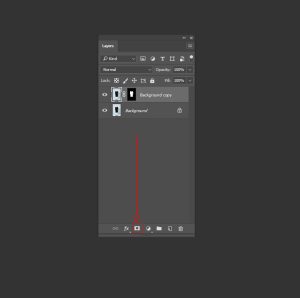
Step 6: Add a Layer Mask to Remove Background
Go to the Layer panel and create a layer Mask. At this stage, the extra part of the image is gone. Now, you can apply the Mask to proceed. At this point, turn off the Background layer. How would you do this? Click on the Eye icon of the Background layer.
Step 7: Select Crop Tool
Now it’s time to go with the back part image. Open it on another tab of Photoshop and crop only the neck portion. You’ll have to use the crop tool for this. Make sure to include the label portion in the image.
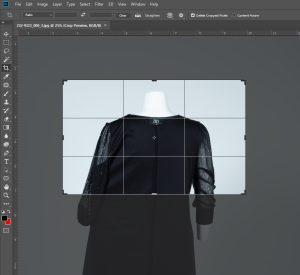
Step 8: Merge the Images
You have a separate collar image now. To merge it with the original, click on its layer and drag on the first one. But dragging isn’t enough, right? Click on Ctrl+T to bring the collar image to the exact position.
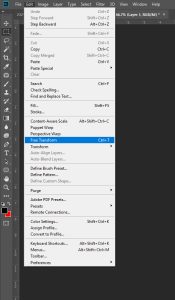
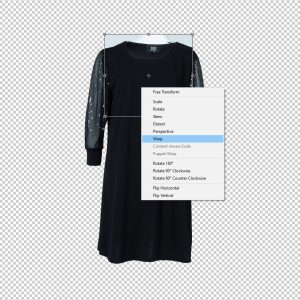
Step 9: Warp and Transformation
Activate Free Transformation on the top bar to align the 2 images flawlessly. Then, open the warp option by clicking on the right button.
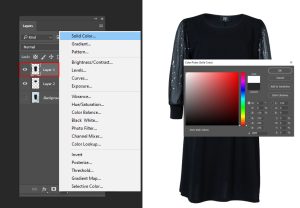
Step 10: Background Change
Activate the selection menu with a right-click. Go to the Background copy layer to change the background color into a darker one.
Step11: Add Shadow
Make shadows with the brush tool under the inner collar to make it realistic. Now select the anchor points in the additional parts to delete them. Pentool will be helpful for this.
At this point, you have a perfectly edited image of a 3D-looking T-shirt. Save the image file with CTRL+Shift+S; that’s all!
Frequently Asked Questions (FAQs)
Read the Answers to the Questions below to clear your remaining confusion.
Question 1: Where to get the invisible mannequin effect professionally?
Ans. Click on the Get a Quote Menu of Overnight Graphics, and let us know your order requirements! It’s simple!
Question 2: Is the ghost mannequin effect costly?
Ans. No, not at all! Overnight Graphics offers the most budget-friendly ghost mannequin service in the industry.
Question 3: Which file format is suitable for saving images on Photoshop?
Ans. There are 2 options on my mind: PSD or JPG. Select PSD if you want to go for some extra edits. And JPG is very convenient for sharing or uploading the file.
Question 4: Is a Model Photoshoot better or a ghost mannequin effect?
Ans. You have the freedom to choose both options. But a ghost mannequin is way more practical for any startup business.
Question 5: Does the ghost mannequin effect in Photoshop software take much time?
Ans. Working on the ghost mannequin effect can be a timely matter for someone new to editing. However, expert editors can perform this effect fast.
Last Words
You’ve found the answer to how to create ghost mannequin effect in Photoshop. Try to repeat the steps to become an expert. Going for professional help is more practical for any business owner. Stay tuned to Overnight Graphics blogs for more updates.